
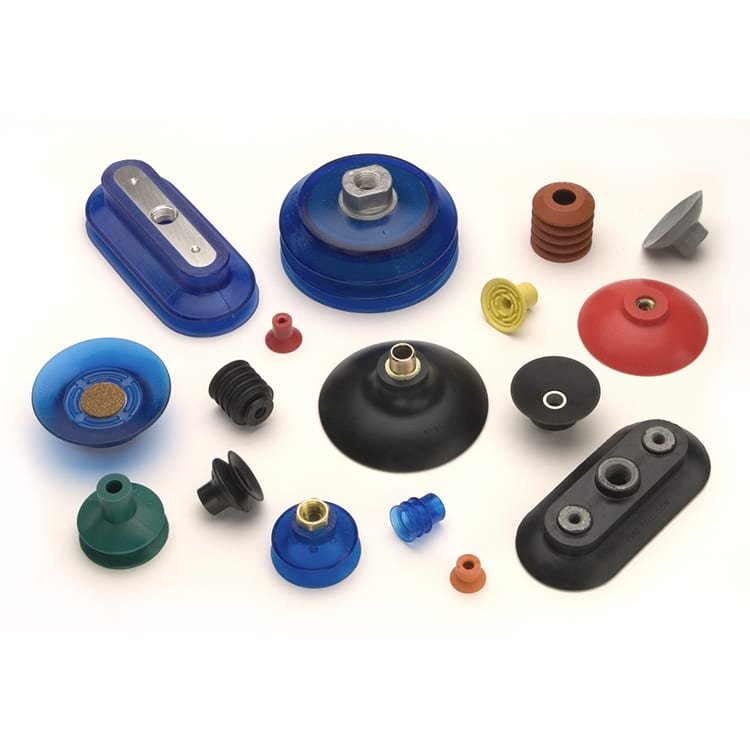
Are you wasting energy and experiencing unreliable performance with your vacuum handling systems? Many manufacturers struggle with excessive air consumption, slow cycle times, and dropped parts due to improper vacuum generator selection. Choosing the right vacuum technology can immediately solve these costly problems.
The ideal vacuum generator1 should match your application’s specific requirements for vacuum level, flow rate, and energy efficiency. Selection requires understanding the relationship between suction force and air flow, considering multi-stage ejector designs for energy savings, and evaluating vacuum retention stability for reliable operation.
I remember visiting a packaging facility in Switzerland last year where they were replacing vacuum cups weekly due to poor generator selection. After analyzing their application and implementing the right vacuum generator with proper sizing, they reduced air consumption by 65% and eliminated product drops completely. Let me share what I’ve learned over my years in the pneumatic industry.
Table of Contents
- Understanding Vacuum Force-Flow Relationship Curves
- Energy-Saving Multi-stage Ejector Solutions
- How to Test and Ensure Vacuum Stability
How Does the Relationship Between Vacuum Force and Flow Rate Affect Your Application?
Understanding the relationship between vacuum force and flow rate is essential for selecting a generator that provides optimal performance for your specific application.
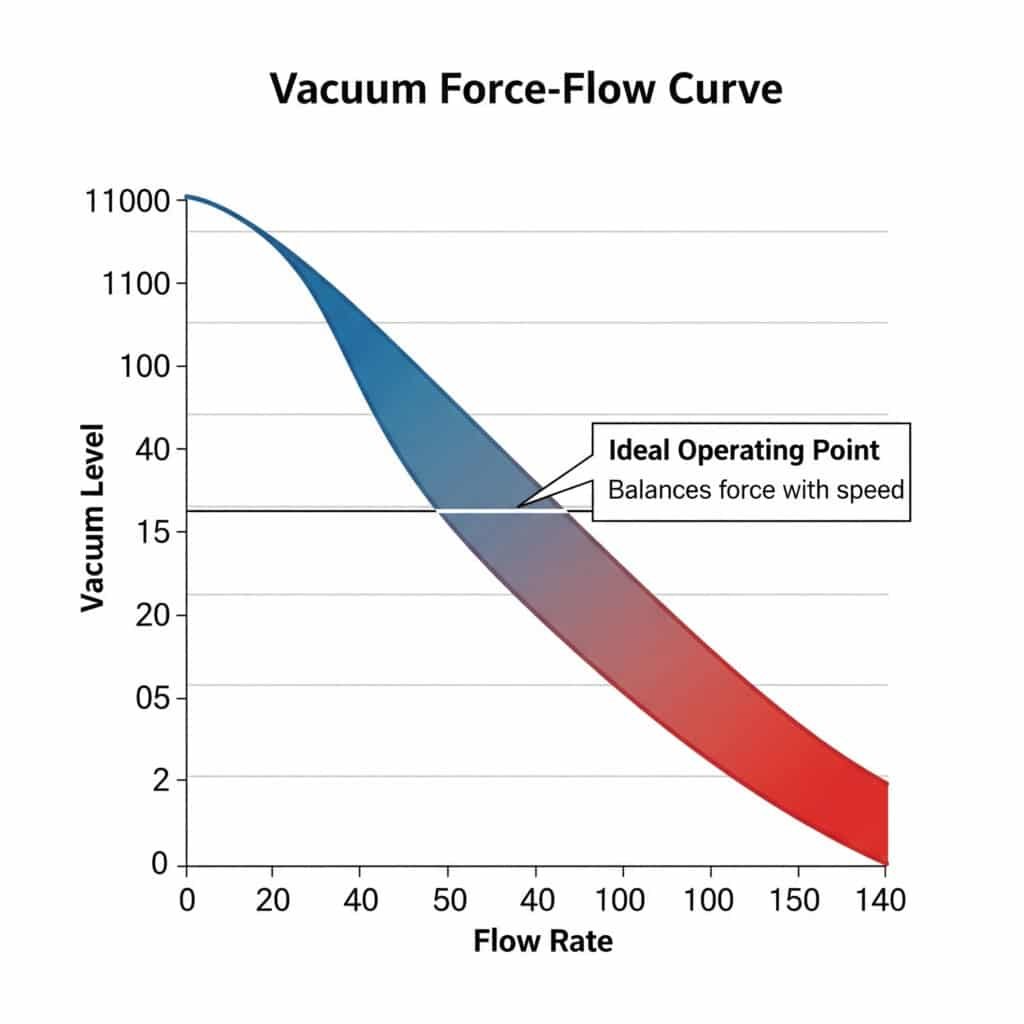
The vacuum force-flow curve2 illustrates how suction force changes with air flow rate. As vacuum level increases, the available flow rate typically decreases. The ideal operating point balances sufficient vacuum force for secure gripping with adequate flow capacity to quickly evacuate the system.
Understanding Vacuum Force-Flow Curves
The vacuum force-flow curve is a graphical representation showing the relationship between:
- Vacuum level (typically measured in -kPa or %)
- Air flow rate (typically measured in L/min or SCFM)
This relationship is crucial because it directly impacts:
- Gripping force available for your application
- Response time for achieving secure grip
- Energy consumption of your vacuum system
- Overall system reliability
Key Parameters on Vacuum Force-Flow Curves
When analyzing vacuum generator specifications, pay attention to these critical points:
Maximum Vacuum Level
This represents the highest vacuum the generator can achieve, typically measured at zero flow:
- Single-stage ejectors: typically -75 to -85 kPa
- Multi-stage ejectors: typically -85 to -92 kPa
- Mechanical vacuum pumps: can exceed -95 kPa
Maximum Flow Rate
This indicates the maximum air volume the generator can evacuate, measured at zero vacuum:
- Determines evacuation speed
- Critical for large volume applications
- Impacts cycle time in production environments
Optimal Operating Point
This is where the generator provides the best balance of vacuum level and flow rate:
- Usually found in the middle section of the curve
- Provides efficient operation for most applications
- Balances energy consumption with performance
Application-Specific Curve Analysis
Different applications require different positions on the force-flow curve:
| Application Type | Ideal Curve Position | Reasoning |
|---|---|---|
| Porous materials | High flow priority | Compensates for leakage through material |
| Non-porous, smooth surfaces | High vacuum priority | Maximizes holding force |
| High-speed pick and place | Balanced position | Optimizes cycle time and reliability |
| Heavy load handling | High vacuum priority | Ensures secure grip under load |
| Varying surface conditions | High flow priority | Adapts to inconsistent sealing |
Calculating Required Suction Force
To determine your required vacuum force:
- Calculate the theoretical force needed:
F = m × (g + a) × S
Where:
– F = Required force (N)
– m = Mass of object (kg)
– g = Gravitational acceleration (9.81 m/s²)
– a = System acceleration (m/s²)
– S = Safety factor (typically 2-3)
- Determine the vacuum cup area needed:
A = F ÷ P
Where:
– A = Cup area (m²)
– F = Required force (N)
– P = Operating vacuum pressure (Pa)
- Select a generator that provides:
– Sufficient vacuum level for the calculated area
– Adequate flow rate for your evacuation time requirements
Real-World Application Example
Last month, I consulted with an electronics manufacturer in Germany who was experiencing slow cycle times in their PCB handling system. Their existing vacuum generator was oversized for vacuum level but undersized for flow rate.
By analyzing their application:
- Required holding force: 15N
- PCB weight: 0.5kg
- System acceleration: 2 m/s²
- Safety factor: 2
We calculated they needed:
- Minimum vacuum level: -40 kPa
- Minimum flow rate: 25 L/min
By selecting a Bepto vacuum generator with balanced characteristics (-60 kPa, 35 L/min), they:
- Reduced evacuation time by 45%
- Increased production throughput by 28%
- Maintained perfect reliability
- Reduced compressed air consumption by 15%
How Can Multi-stage Ejectors Optimize Your Vacuum System’s Energy Efficiency?
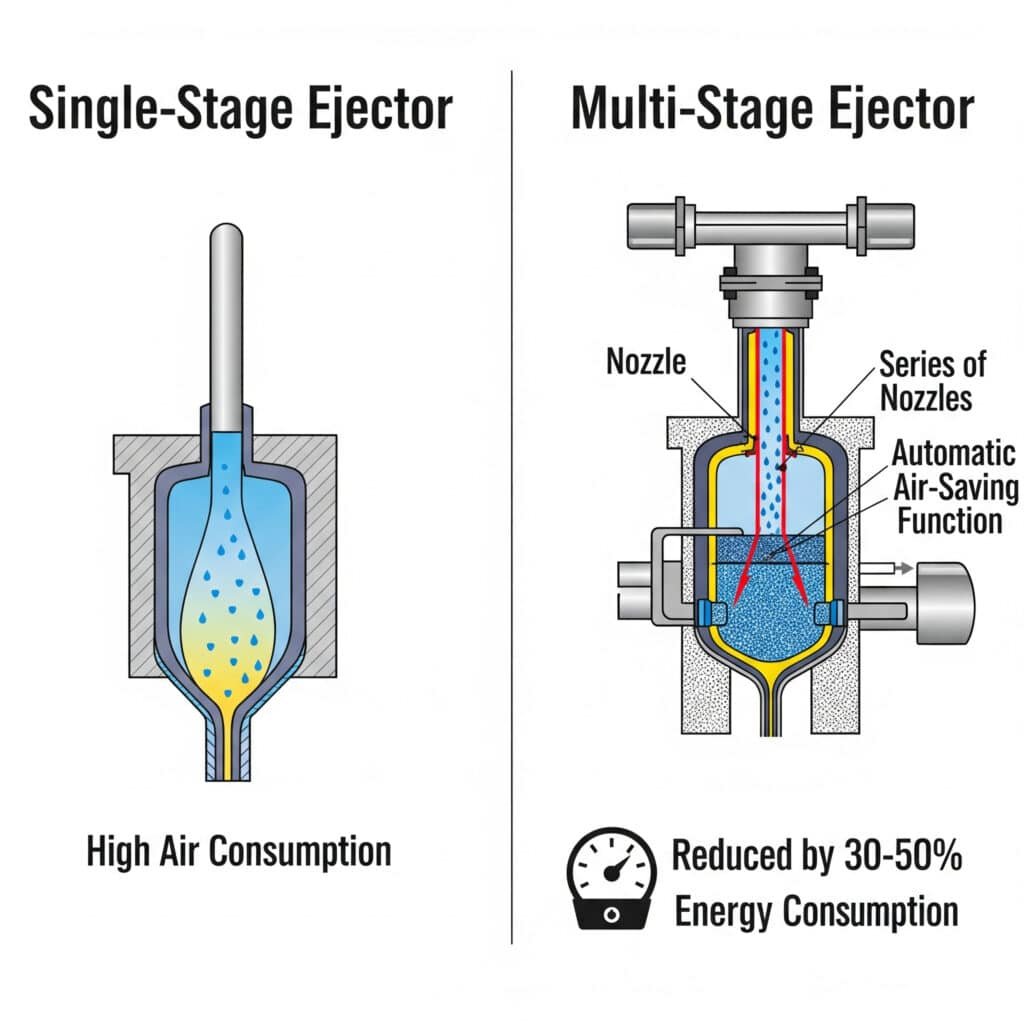
Multi-stage ejector3 technology can dramatically reduce compressed air consumption while maintaining or improving vacuum performance in most applications.
Multi-stage ejectors use a series of optimized nozzles and diffusers to create vacuum more efficiently than single-stage designs. They typically reduce energy consumption by 30-50% by operating at lower pressures during holding phases and incorporating automatic air-saving functions.
Understanding Multi-stage Ejector Technology
Multi-stage ejectors represent a significant advancement over traditional single-stage designs:
How Multi-stage Ejectors Work
Initial evacuation stage
– High flow rate for rapid evacuation
– Optimized nozzle geometry for maximum air entrainment
– Quickly reaches initial vacuum levelDeep vacuum stage
– Secondary nozzles activate for higher vacuum levels
– Lower flow rate but more efficient vacuum generation
– Reaches maximum vacuum levelHolding stage
– Minimal air consumption to maintain vacuum
– Intelligent control systems monitor vacuum levels
– Air supply can be reduced or temporarily shut off
Energy-Saving Features in Modern Multi-stage Ejectors
Advanced multi-stage ejectors incorporate several energy-saving technologies:
Air-Saving Function (ASF)4
This feature automatically controls compressed air supply:
- Monitors vacuum level continuously
- Shuts off air supply when target vacuum is reached
- Restarts air supply when vacuum drops below threshold
- Can reduce air consumption by up to 90% in certain applications
Automatic Level Control
This optimizes the vacuum level based on:
- Current application requirements
- Object weight and surface characteristics
- Production speed and cycle time
- Can be dynamically adjusted during operation
Condition Monitoring
Modern ejectors include intelligent monitoring:
- Detects leakage in the vacuum system
- Identifies when cups are worn or damaged
- Provides predictive maintenance alerts
- Optimizes performance in real-time
Comparative Energy Efficiency Analysis
| Ejector Type | Air Consumption (NL/min) | Energy Cost Per Year* | Vacuum Level | Response Time |
|---|---|---|---|---|
| Single-stage | 70-100 | $1,200-1,700 | -75 to -85 kPa | Fast |
| Two-stage | 40-60 | $700-1,000 | -85 to -90 kPa | Medium |
| Three-stage with ASF | 15-30 | $250-500 | -85 to -92 kPa | Medium-Fast |
| Bepto Smart Ejector | 10-25 | $170-425 | -88 to -92 kPa | Fast |
*Based on 8-hour shifts, 250 working days, 50% duty cycle, $0.10/kWh electricity cost
Implementation Case Study
I recently helped a furniture manufacturer in Italy optimize their wood panel handling system. They were using single-stage ejectors consuming approximately 85 NL/min of compressed air per station across 12 stations.
By implementing Bepto multi-stage ejectors with air-saving function:
- Air consumption reduced from 85 NL/min to 22 NL/min per station
- Annual compressed air savings of approximately 9,000,000 NL
- Energy cost reduction of $11,500 per year
- ROI achieved in less than 4 months
- Vacuum level improved from -78 kPa to -88 kPa
- Product handling reliability increased by 15%
Implementation Strategy for Multi-stage Ejectors
To maximize the benefits of multi-stage ejector technology:
Audit your current system
– Measure actual air consumption
– Record vacuum levels and response times
– Identify leakage points and inefficienciesAnalyze your application requirements
– Calculate minimum required vacuum force
– Determine optimal evacuation time
– Consider material porosity and surface conditionsSelect appropriate multi-stage technology
– Match ejector specifications to application needs
– Consider integrated control options
– Evaluate monitoring capabilitiesImplement with proper settings
– Optimize pressure settings
– Set appropriate vacuum thresholds
– Configure air-saving function parametersMonitor and adjust
– Track energy consumption
– Verify performance metrics
– Fine-tune settings for optimal efficiency
How Can You Test and Ensure Vacuum System Stability for Reliable Operation?
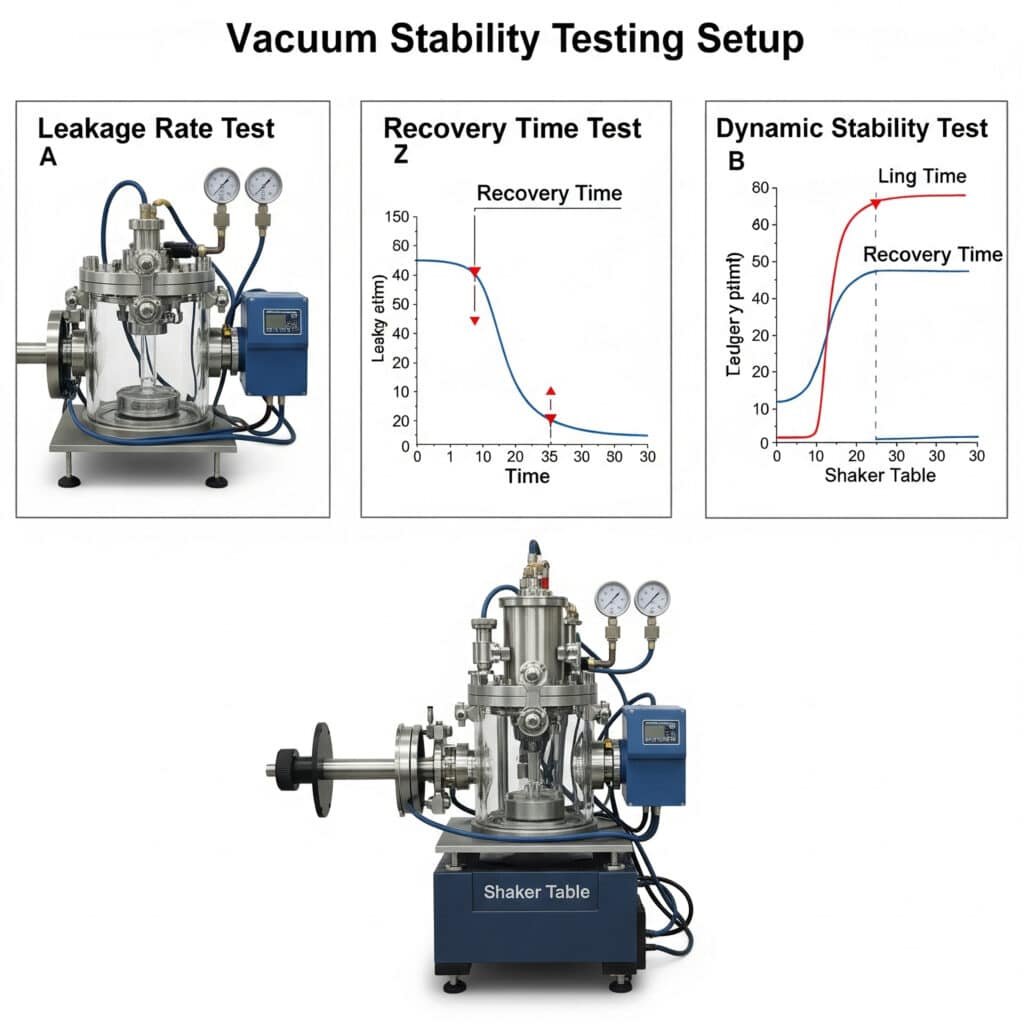
Vacuum stability testing is crucial for ensuring consistent performance and preventing costly failures in production environments.
Vacuum retention testing evaluates how well a system maintains vacuum over time. Key metrics include leakage rate, recovery time, and stability under dynamic conditions. Proper testing helps identify potential issues before they cause production problems and ensures reliable operation.
Essential Vacuum Stability Testing Methods
Comprehensive vacuum system evaluation requires several testing approaches:
Static Vacuum Retention Test5
This fundamental test measures how well the system maintains vacuum without active generation:
Test procedure:
– Generate vacuum to target level
– Isolate the system (turn off generator)
– Measure vacuum decay over time
– Record time to reach critical thresholdKey metrics:
– Vacuum decay rate (kPa/min or %/min)
– Time to 90% of original vacuum level
– Time to minimum functional vacuum levelAcceptable results:
– High-quality system: <5% decay over 30 seconds
– Standard system: <10% decay over 30 seconds
– Minimal acceptable: Maintains functional vacuum for complete cycle time
Dynamic Load Testing
This evaluates system performance under real-world conditions:
Test procedure:
– Apply vacuum to actual workpiece
– Subject to normal handling movements
– Apply typical acceleration forces
– Introduce vibration if present in applicationKey metrics:
– Vacuum level stability during movement
– Recovery time after disturbances
– Minimum vacuum level during operationEvaluation criteria:
– Vacuum should remain above minimum required level
– Recovery should occur within acceptable timeframe
– System should maintain stability throughout cycle
Leakage Detection Methods
Identifying vacuum leaks is critical for system optimization:
Pressure differential testing:
– Pressurize system slightly above atmospheric
– Apply soapy water solution to connections
– Look for bubble formation indicating leaksUltrasonic leak detection:
– Use ultrasonic detector to identify high-frequency sounds
– Scan system components methodically
– Document and quantify leak locationsVacuum decay mapping:
– Isolate different sections of the system
– Measure decay rate in each section
– Identify areas with highest leakage rates
Standardized Testing Protocol
For consistent evaluation, follow this standardized testing approach:
Test Equipment Requirements
- Calibrated vacuum gauge (digital preferred)
- Timer with second precision
- Data logging capability (for detailed analysis)
- Known volume test chamber
- Controlled temperature environment
Standard Test Conditions
- Supply pressure: 6 bar (87 psi)
- Ambient temperature: 20-25°C (68-77°F)
- Relative humidity: 40-60%
- Test volume: Appropriate to application
- Test duration: Minimum 2× typical cycle time
Test Sequence
- Generate vacuum to 90% of maximum rated level
- Allow stabilization (typically 5 seconds)
- Isolate system or maintain as per test type
- Record measurements at defined intervals
- Repeat test 3 times for statistical validity
- Calculate average results and standard deviation
Vacuum Stability Testing Results Analysis
| Test Parameter | Excellent | Acceptable | Marginal | Poor |
|---|---|---|---|---|
| Static decay rate | <3% per minute | 3-8% per minute | 8-15% per minute | >15% per minute |
| Recovery time | <0.5 seconds | 0.5-1.5 seconds | 1.5-3 seconds | >3 seconds |
| Minimum dynamic level | >95% of static | 85-95% of static | 75-85% of static | <75% of static |
| System leakage | <2% of capacity | 2-5% of capacity | 5-10% of capacity | >10% of capacity |
Troubleshooting Common Vacuum Stability Issues
When testing reveals stability problems, consider these common causes and solutions:
Poor Vacuum Retention
Possible causes:
– Damaged vacuum cups or seals
– Loose fittings or connections
– Porous or rough material surface
– Undersized vacuum generatorSolutions:
– Replace worn components
– Check and tighten all connections
– Consider specialized cups for porous materials
– Upgrade to higher capacity generator
Slow Recovery Time
Possible causes:
– Insufficient flow capacity
– Restrictive tubing or fittings
– Undersized vacuum generator
– Excessive system volumeSolutions:
– Increase tubing diameter
– Eliminate unnecessary restrictions
– Select generator with higher flow rate
– Minimize system volume when possible
Unstable Dynamic Performance
Possible causes:
– Insufficient vacuum reserve
– Vacuum cup design not suited for application
– Excessive acceleration forces
– Vibration in the systemSolutions:
– Add vacuum reservoir
– Select cups designed for dynamic applications
– Reduce acceleration if possible
– Implement vibration dampening
Case Study: Vacuum Stability Improvement
A customer in the automotive industry was experiencing intermittent part drops during high-speed transfer operations. Their existing vacuum system passed basic tests but failed under dynamic conditions.
Our testing revealed:
- Static retention: Acceptable (5% decay per minute)
- Dynamic performance: Poor (dropped to 65% of static level)
- Recovery time: Marginal (2.5 seconds)
After implementing Bepto vacuum generators with integrated reservoirs and optimized cup selection:
- Static retention improved to 2% decay per minute
- Dynamic performance maintained >90% of static level
- Recovery time reduced to 0.3 seconds
- Part drops eliminated completely
- Production speed increased by 18%
Conclusion
Selecting the right vacuum generator requires understanding the relationship between vacuum force and flow rate, considering energy-efficient multi-stage ejector technology, and implementing proper stability testing protocols. By applying these principles, you can optimize performance, reduce energy consumption, and ensure reliable operation in your vacuum handling systems.
FAQs About Vacuum Generator Selection
What is the difference between a single-stage and multi-stage vacuum ejector?
A single-stage ejector uses one nozzle and diffuser to generate vacuum, while a multi-stage ejector incorporates multiple nozzle-diffuser combinations optimized for different phases of vacuum generation. Multi-stage ejectors typically achieve higher vacuum levels, better efficiency, and reduced air consumption compared to single-stage designs.
How do I calculate the correct vacuum cup size for my application?
Calculate the required vacuum cup area by dividing the necessary holding force by the operating vacuum pressure. The holding force should equal the object’s weight multiplied by acceleration (including gravity) and a safety factor (typically 2-3). For example, a 1kg object with 2g acceleration and safety factor of 2 requires approximately 40N of force.
What causes vacuum leakage in a handling system?
Vacuum leakage typically results from damaged cups or seals, loose connections, porous materials being handled, improper cup selection for the surface, worn components, or improper installation. Regular inspection and maintenance of vacuum cups, seals, and connections can significantly reduce leakage issues.
How much energy can be saved by switching to a multi-stage ejector with air-saving function?
Switching from a traditional single-stage ejector to a multi-stage ejector with air-saving function typically reduces compressed air consumption by 30-80%, depending on the application and duty cycle. For systems operating 8 hours daily, this can translate to thousands of dollars in annual energy savings.
What is the optimal vacuum level for handling non-porous materials?
For non-porous materials, a vacuum level between -40 kPa and -60 kPa is typically sufficient. Higher levels (-70 kPa to -90 kPa) may be necessary for heavy loads or high accelerations but consume more energy. The optimal level balances secure holding force with energy efficiency and component longevity.
How often should vacuum cups be replaced in a production environment?
Vacuum cups should be replaced when signs of wear appear (cracks, hardening, deformation) or when vacuum retention tests show degraded performance. In typical production environments, this ranges from 3-12 months depending on operating conditions, cup material, and application. Implementing a preventive maintenance schedule based on operating hours is recommended.
-
Explains the Venturi effect, a principle of fluid dynamics where a reduction in fluid pressure occurs when a fluid flows through a constricted section (or choke) of a pipe, which is the basis for most pneumatic vacuum generators. ↩
-
Provides a guide on how to interpret pump performance curves, which graphically represent a pump’s performance in terms of flow rate, pressure or head, efficiency, and power consumption. ↩
-
Details the design differences between single-stage and multi-stage vacuum ejectors and explains the thermodynamic principles that allow multi-stage designs to generate vacuum more efficiently, consuming less compressed air. ↩
-
Describes the operation of an air-saving function in a vacuum ejector, an intelligent feature that uses an integrated sensor and valve to shut off the compressed air supply once a target vacuum level is reached, significantly reducing energy consumption. ↩
-
Explains the vacuum decay test, a quantitative leak testing method where a part is evacuated to a certain vacuum level, isolated from the pump, and then monitored for any increase in pressure, which indicates the presence and severity of a leak. ↩