Are your pneumatic fixtures causing misalignment, vibration-induced quality issues, or excessive changeover time? These common problems often stem from improper fixture selection, leading to production delays, quality rejections, and increased maintenance costs. Selecting the right pneumatic fixture can immediately solve these critical issues.
Die ideale pneumatische Vorrichtung muss eine präzise Synchronisierung mehrerer Backen, eine wirksame Schwingungsdämpfung und eine Schnellwechselkompatibilität mit Ihren bestehenden Systemen bieten. Die richtige Auswahl setzt voraus, dass Sie die Standards für die Synchronisationsgenauigkeit, die dynamischen Schwingungsdämpfungseigenschaften und die Kompatibilitätsanforderungen für Schnellwechselmechanismen kennen.
I recently consulted with an automotive components manufacturer who was experiencing a 4.2% rejection rate due to part misalignment and vibration-induced defects. After implementing properly specified pneumatic fixtures with enhanced synchronization and vibration control, their rejection rate dropped below 0.3%, saving over $230,000 annually in scrap and rework costs. Let me share what I’ve learned about selecting the perfect pneumatic fixture for your application.
Inhaltsübersicht
- How to Apply Multi-jaw Synchronization Accuracy Standards for Precision Applications
- Anti-vibration Structure Dynamic Analysis for Optimal Stability
- Quick-change Mechanism Compatibility Guide for Efficient Changeovers
How to Apply Multi-jaw Synchronization Accuracy Standards for Precision Applications
Synchronization accuracy in multi-jaw pneumatic fixtures directly impacts part positioning precision and overall production quality.
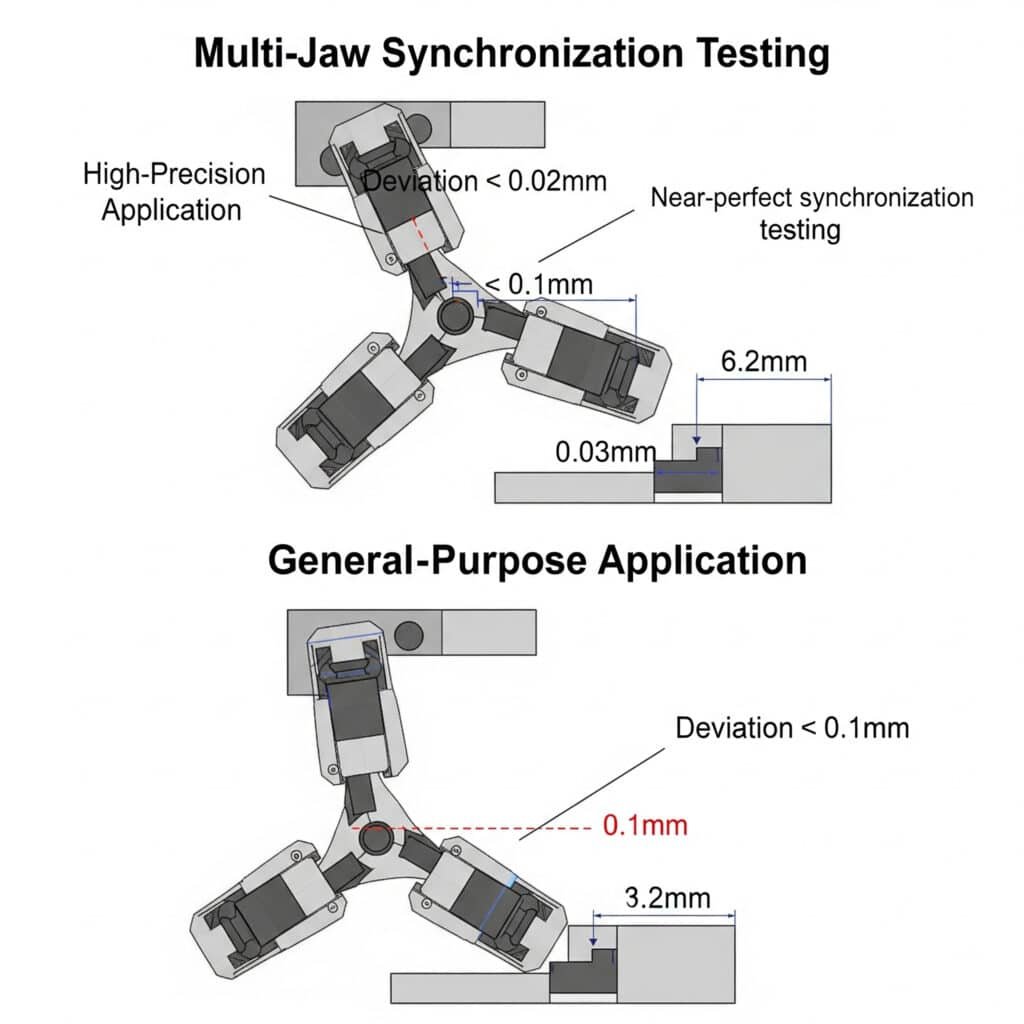
Multi-jaw synchronization accuracy refers to the maximum positional deviation between any two jaws during the clamping cycle, typically measured in hundredths of a millimeter. Industry standards define acceptable synchronization tolerances based on application precision requirements, with high-precision applications demanding deviations below 0.02mm while general-purpose applications may tolerate up to 0.1mm.
Understanding Synchronization Accuracy Standards
Synchronization standards vary by industry and application precision requirements:
| Industry | Application Type | Synchronization Tolerance | Measurement Standard | Häufigkeit der Tests |
|---|---|---|---|---|
| Automotive | General assembly | ±0.05-0.1mm | ISO 230-21 | Vierteljährlich |
| Automotive | Precision components | ±0.02-0.05mm | ISO 230-2 | Monatlich |
| Aerospace | General components | ±0.03-0.05mm | AS9100D | Monatlich |
| Aerospace | Critical components | ±0.01-0.02mm | AS9100D | Wöchentlich |
| Medical | Surgical instruments | ±0.01-0.03mm | ISO 13485 | Wöchentlich |
| Electronics | PCB assembly | ±0.02-0.05mm | IPC-A-610 | Monatlich |
| General manufacturing | Non-critical parts | ±0.08-0.15mm | ISO 9001 | Bi-annually |
Standardized Testing Methodologies
Several established methods exist for measuring multi-jaw synchronization accuracy:
Displacement Sensor Method (ISO 230-2 Compliant)
This is the most common and reliable testing approach:
Testaufbau
– Mount high-precision displacement sensors (LVDT2 or capacitive) on a reference fixture
– Position sensors to contact each jaw at identical relative positions
– Connect sensors to synchronized data acquisition system
– Ensure temperature stability (20°C ±1°C)Testverfahren
– Initialize system with jaws in fully open position
– Activate clamping cycle at standard operating pressure
– Record position data for all jaws throughout movement
– Repeat test minimum 5 times
– Measure under various conditions:
– Standard operating pressure
– Minimum specified pressure (-10%)
– Maximum specified pressure (+10%)
– With maximum rated payload
– At different speeds (if adjustable)Analyse der Daten
– Calculate maximum deviation between any two jaws at each point in travel
– Determine maximum synchronization error across full stroke
– Analyze repeatability across multiple test cycles
– Identify any patterns of consistent lead/lag between specific jaws
Optical Measurement System
For high-precision applications or complex jaw movements:
Setup and calibration
– Mount optical targets on each jaw
– Position high-speed cameras to capture all targets simultaneously
– Calibrate system to establish spatial referenceMeasurement process
– Record jaw movement at high frame rate (500+ fps)
– Process images to extract position data
– Calculate 3D position of each jaw throughout cycleAnalyse-Metriken
– Maximum positional deviation between jaws
– Angular synchronization accuracy
– Trajectory consistency
Factors Affecting Synchronization Accuracy
Several key factors influence the synchronization performance of multi-jaw fixtures:
Mechanical Design Factors
Kinematic mechanism type
– Wedge-actuated: Good synchronization, compact design
– Cam-actuated: Excellent synchronization, complex design
– Linkage systems: Variable synchronization, simple design
– Direct-drive: Poor natural synchronization, requires compensationJaw guidance system
– Linear bearings: High precision, sensitive to contamination
– Dovetail slides: Moderate precision, good durability
– Roller guides: Good precision, excellent durability
– Plain bearings: Lower precision, simple constructionManufacturing precision
– Component tolerances
– Assembly accuracy
– Material stability
Pneumatic System Factors
Air distribution design
– Balanced manifold design: Critical for equal pressure distribution
– Equal tube lengths: Minimizes timing differences
– Flow restrictor balancing: Compensates for mechanical differencesActuation control
– Pressure regulation precision
– Flow control consistency
– Valve response timeSystem dynamics
– Air compressibility effects
– Dynamic pressure variations
– Flow resistance differences
Synchronization Compensation Techniques
For applications requiring exceptional synchronization, these compensation techniques can be employed:
Mechanical compensation
– Adjustable linkages for initial synchronization
– Precision shims for jaw alignment
– Cam profile optimizationPneumatic compensation
– Individual flow controls for each jaw
– Sequence valves for controlled movement
– Pressure balancing chambersAdvanced control systems
– Servo-pneumatic position control
– Electronic synchronization monitoring
– Adaptive control algorithms
Case Study: Synchronization Improvement in Automotive Application
I recently worked with a tier-one automotive supplier manufacturing aluminum transmission housings. They were experiencing inconsistent part seating in their machining fixtures, resulting in dimensional variations and occasional crashes.
Die Analyse ergab:
- Existing 4-jaw fixture with ±0.08mm synchronization error
- Requirement: ±0.03mm maximum deviation
- Challenge: Retrofit solution without complete fixture replacement
Durch die Implementierung einer umfassenden Lösung:
- Upgraded to precision-matched linkage components
- Installed balanced pneumatic distribution manifold
- Added individual flow control valves with locking adjustment
- Implemented regular verification using displacement sensor testing
Die Ergebnisse waren signifikant:
- Improved synchronization accuracy to ±0.025mm
- Reduced part positioning variation by 68%
- Eliminated fixture-related machine crashes
- Decreased quality rejections by 71%
- ROI achieved in 7.5 weeks
Anti-vibration Structure Dynamic Analysis for Optimal Stability
Vibration in pneumatic fixtures can significantly impact machining quality, tool life, and production efficiency. Proper anti-vibration design is critical for high-precision applications.
Anti-vibration structures in pneumatic fixtures utilize targeted damping materials, optimized mass distribution, and tuned dynamic characteristics to minimize harmful vibrations. Effective designs reduce vibration amplitude by 85-95% at critical frequencies while maintaining necessary fixture rigidity, resulting in improved surface finish, extended tool life, and enhanced dimensional accuracy.

Understanding Fixture Vibration Dynamics
Fixture vibration involves complex interactions between multiple components and forces:
Key Vibration Concepts
- Natural frequency: The inherent frequency at which a structure tends to vibrate when disturbed
- Resonance: Amplification of vibration when excitation frequency matches natural frequency
- Damping ratio: Measure of how quickly vibration energy dissipates (higher is better)
- Transmissibility: Ratio of output vibration to input vibration
- Modal analysis: Identification of vibration modes and their characteristics
- Frequency response function: Relationship between input and output at different frequencies
Critical Vibration Parameters
| Parameter | Bedeutung | Messverfahren | Target Range |
|---|---|---|---|
| Natural frequency | Determines resonance potential | Impact testing, modal analysis | >30% above/below operation frequency |
| Dämpfungsverhältnis | Energy dissipation capability | Logarithmic decrement, half-power | 0.05-0.15 (higher is better) |
| Transmissibility | Vibration isolation effectiveness | Accelerometer comparison | <0.3 at operating frequency |
| Stiffness | Load capacity and deflection resistance | Static load testing | Anwendungsspezifisch |
| Dynamic compliance | Displacement per unit force | Frequency response function | Minimize at cutting frequencies |
Dynamic Analysis Methodologies
Several established methods exist for analyzing fixture vibration characteristics:
Experimental Modal Analysis3
The gold standard for understanding actual fixture dynamics:
Testaufbau
– Mount fixture in actual operating condition
– Install accelerometers at strategic locations
– Use calibrated impact hammer or shaker for excitation
– Connect to multi-channel dynamic signal analyzerTestverfahren
– Apply impact or swept-sine excitation
– Measure response at multiple points
– Calculate frequency response functions
– Extract modal parameters (frequency, damping, mode shapes)Analyse-Metriken
– Natural frequencies and their proximity to operation frequencies
– Damping ratios at critical modes
– Mode shapes and potential interference with workpiece
– Frequency response at typical machining frequencies
Operational Deflection Shape Analysis
For understanding behavior under actual operating conditions:
Measurement process
– Install accelerometers across fixture and workpiece
– Record vibration during actual machining operations
– Use phase-referenced measurementsAnalysis techniques
– Animate deflection shapes at problem frequencies
– Identify maximum deflection locations
– Determine phase relationships between components
– Correlate with quality issues
Anti-vibration Design Strategies
Effective anti-vibration fixtures incorporate multiple strategies:
Structural Design Approaches
Mass distribution optimization
– Increase mass at critical locations
– Balance mass distribution for minimal moment
– Use finite element analysis4 to optimizeStiffness enhancement
– Triangulated support structures
– Strategic ribbing in high-deflection areas
– Material selection for optimal stiffness-to-weight ratioDamping integration
– Constrained layer damping at strategic locations
– Tuned mass dampers for specific frequencies
– Viscoelastic material inserts at interfaces
Material Selection for Vibration Control
| Material Type | Damping Capacity | Stiffness | Gewicht | Beste Anwendungen |
|---|---|---|---|---|
| Cast iron | Ausgezeichnet | Sehr gut | Hoch | General purpose fixtures |
| Polymer concrete | Herausragend | Gut | Hoch | Precision machining fixtures |
| Aluminum with damping inserts | Gut | Gut | Mäßig | Lightweight, moderate precision |
| Steel with constrained damping | Sehr gut | Ausgezeichnet | Hoch | Heavy machining |
| Composite materials | Ausgezeichnet | Variabel | Niedrig | Special applications |
Vibration Isolation Techniques
For separating fixture from vibration sources:
Passive isolation systems
– Elastomeric isolators (natural rubber, neoprene)
– Pneumatic isolators
– Spring-damper systemsActive isolation systems
– Piezoelectric actuators
– Electromagnetic actuators
– Feedback control systemsHybrid systems
– Combined passive/active solutions
– Adaptive tuning capabilities
Case Study: Anti-vibration Improvement in Precision Machining
I recently consulted with a medical device manufacturer producing titanium implant components. They were experiencing inconsistent surface finish and tool life variability during high-speed milling operations.
Die Analyse ergab:
- Fixture natural frequency of 220Hz closely matching spindle frequency
- Amplification factor of 8.5x at resonance
- Insufficient damping (ratio of 0.03)
- Uneven vibration distribution across fixture
Durch die Implementierung einer umfassenden Lösung:
- Redesigned fixture with optimized ribbing pattern
- Added constrained layer damping to primary surfaces
- Incorporated tuned mass damper targeting 220Hz
- Installed pneumatic isolation system
Die Ergebnisse waren signifikant:
- Shifted natural frequency to 380Hz (away from operation range)
- Increased damping ratio to 0.12
- Reduced vibration amplitude by 91%
- Improved surface finish consistency by 78%
- Extended tool life by 2.3x
- Reduced cycle time by 15% through higher cutting parameters
Quick-change Mechanism Compatibility Guide for Efficient Changeovers
Quick-change mechanisms significantly reduce setup time and enhance production flexibility, but only when properly matched to your specific requirements.
Quick-change mechanisms in pneumatic fixtures utilize standardized interface systems to enable rapid fixture changeover without sacrificing precision or stability. Selecting compatible systems requires understanding connection standards, repeatability specifications, and interface requirements to ensure seamless integration with existing equipment while maintaining required positioning accuracy.

Understanding Quick-change System Types
Several standardized quick-change systems exist, each with distinct characteristics:
Major Quick-change Standards
| System Typ | Interface Standard | Positionierungsgenauigkeit | Tragfähigkeit | Locking Mechanism | Beste Anwendungen |
|---|---|---|---|---|---|
| Zero-point clamping5 | AMF/Stark/Schunk | ±0,005 mm | Hoch | Mechanical/pneumatic | Präzisionsbearbeitung |
| Pallet systems | System 3R/Erowa | ±0.002-0.005mm | Mittel | Mechanical/pneumatic | EDM, grinding, milling |
| T-slot based | Jergens/Carr Lane | ±0.025mm | Hoch | Mechanical | General machining |
| Ball-lock | Jergens/Halder | ±0.013mm | Medium-high | Mechanical | Versatile applications |
| Magnetic | Maglock/Eclipse | ±0.013mm | Mittel | Electromagnetic | Flat workpieces |
| Pyramid/cone | VDI/ISO | ±0.010mm | Hoch | Mechanical/hydraulic | Heavy machining |
Compatibility Assessment Factors
When evaluating quick-change system compatibility, consider these key factors:
Mechanical Interface Compatibility
Physical connection standards
– Mounting pattern dimensions
– Receiver/stud specifications
– Clearance requirements
– Alignment feature designLoad capacity matching
– Static load rating
– Dynamic load capability
– Moment load limitations
– Safety factor requirementsEnvironmental compatibility
– Temperature range
– Coolant/contaminant exposure
– Cleanroom requirements
– Wash-down needs
Performance Compatibility
Accuracy requirements
– Repeatability specifications
– Absolute positioning accuracy
– Thermal stability characteristics
– Long-term stabilityOperational factors
– Clamping/unclamping time
– Actuation pressure requirements
– Monitoring capabilities
– Failure mode behavior
Comprehensive Compatibility Matrix
This matrix provides cross-compatibility between major quick-change systems:
| System | AMF | Schunk | Stark | System 3R | Erowa | Jergens | Carr Lane | Maglock |
|---|---|---|---|---|---|---|---|---|
| AMF | Native | Adapter | Direct | Adapter | Nein | Adapter | Adapter | Nein |
| Schunk | Adapter | Native | Adapter | Nein | Nein | Adapter | Adapter | Nein |
| Stark | Direct | Adapter | Native | Nein | Nein | Adapter | Adapter | Nein |
| System 3R | Adapter | Nein | Nein | Native | Adapter | Nein | Nein | Nein |
| Erowa | Nein | Nein | Nein | Adapter | Native | Nein | Nein | Nein |
| Jergens | Adapter | Adapter | Adapter | Nein | Nein | Native | Direct | Adapter |
| Carr Lane | Adapter | Adapter | Adapter | Nein | Nein | Direct | Native | Adapter |
| Maglock | Nein | Nein | Nein | Nein | Nein | Adapter | Adapter | Native |
Pneumatic Interface Requirements
Quick-change systems require proper pneumatic connections for operation:
Pneumatic Connection Standards
| System Typ | Connection Standard | Betriebsdruck | Flow Requirement | Control Interface |
|---|---|---|---|---|
| Zero-point | M5/G1/8 | 5-6 bar | 20-40 l/min | 5/2 or 5/3 valve |
| Pallet | M5 | 6-8 bar | 15-25 l/min | 5/2 valve |
| Ball-lock | G1/4 | 5-7 bar | 30-50 l/min | 5/2 valve |
| Pyramid | G1/4 | 6-8 bar | 40-60 l/min | 5/2 valve with pressure booster |
Implementation Strategy for Mixed Systems
For facilities with multiple quick-change standards:
Standardization assessment
– Inventory existing systems
– Evaluate performance requirements
– Determine migration feasibilityTransition approaches
– Direct replacement strategy
– Adapter-based integration
– Hybrid system implementation
– Phased migration planDocumentation requirements
– Interface specifications
– Adapter requirements
– Pressure/flow specifications
– Maintenance procedures
Case Study: Quick-change System Integration
I recently worked with a contract manufacturer producing components for multiple industries. They were struggling with excessive changeover times and inconsistent positioning when switching between different product lines.
Die Analyse ergab:
- Three incompatible quick-change systems across 12 machines
- Average changeover time of 42 minutes
- Positioning repeatability issues after changeover
- Pneumatic connection complications
Durch die Implementierung einer umfassenden Lösung:
- Standardized on zero-point clamping system
- Developed custom adapters for legacy fixtures
- Created standardized pneumatic interface panel
- Implemented color-coded connection system
- Developed visual work instructions
Die Ergebnisse waren beeindruckend:
- Reduced average changeover time to 8.5 minutes
- Improved positioning repeatability to ±0.008mm
- Eliminated connection errors
- Increased machine utilization by 14%
- ROI achieved in 4.2 months
Comprehensive Pneumatic Fixture Selection Strategy
To select the optimal pneumatic fixture for any application, follow this integrated approach:
Define precision requirements
– Determine required part positioning accuracy
– Identify critical dimensions and tolerances
– Establish acceptable vibration limits
– Define changeover time targetsAnalyze operational conditions
– Characterize machining forces and vibrations
– Document environmental factors
– Map workflow and changeover requirements
– Identify compatibility constraintsSelect appropriate technologies
– Choose synchronization mechanism based on accuracy needs
– Select anti-vibration features based on dynamic analysis
– Determine quick-change system based on compatibilityAuswahl validieren
– Prototype testing where feasible
– Benchmark against industry standards
– Calculate expected ROI and performance improvements
Integrierte Auswahlmatrix
| Anforderungen an die Bewerbung | Recommended Synchronization | Anti-vibration Approach | Quick-change System |
|---|---|---|---|
| High precision, light machining | Cam-actuated (±0.01-0.02mm) | Composite structure with tuned damping | Precision zero-point |
| Medium precision, heavy machining | Wedge-actuated (±0.03-0.05mm) | Cast iron with constrained layer damping | Ball-lock or pyramid |
| General purpose, frequent changes | Linkage system (±0.05-0.08mm) | Steel with strategic ribbing | T-slot based system |
| High-speed, vibration-sensitive | Direct-drive with compensation | Active damping system | Precision pallet system |
| Large parts, moderate precision | Pneumatic synchronization | Mass optimization and isolation | Heavy-duty zero-point |
Schlussfolgerung
Selecting the optimal pneumatic fixture requires understanding multi-jaw synchronization standards, anti-vibration dynamic characteristics, and quick-change compatibility requirements. By applying these principles, you can achieve precise part positioning, minimize harmful vibrations, and reduce changeover times in any manufacturing application.
FAQs About Pneumatic Fixture Selection
How often should multi-jaw synchronization be tested in production environments?
For general manufacturing applications, test synchronization quarterly. For precision applications (medical, aerospace), test monthly. For critical applications with tight tolerances (<0.02mm), implement weekly verification. Always test after any maintenance, pressure changes, or when quality issues arise. Use calibrated displacement sensors and document results in your quality system. Consider implementing simple go/no-go tests for daily operator verification between formal measurements.
What is the most cost-effective anti-vibration solution for existing fixtures?
For existing fixtures, constrained layer damping is typically the most cost-effective retrofit solution. Apply viscoelastic polymer sheets with thin metal constraining layers to high-vibration areas identified through tap testing or modal analysis. Focus on areas with maximum deflection in problematic vibration modes. This approach typically reduces vibration by 50-70% at modest cost. For more effectiveness, consider adding mass at strategic locations and implementing isolation mounts between the fixture and machine table.
Can I mix different quick-change systems in the same manufacturing cell?
Yes, but it requires careful planning and adapter strategy. First, identify your “primary” system based on accuracy requirements and existing investment. Then use dedicated adapters to integrate secondary systems. Document adapter stacking effects on accuracy and rigidity, as each interface adds potential error. Create clear visual identification systems to prevent mismatches and standardize pneumatic connections across all systems. For long-term efficiency, develop a migration plan to standardize on a single system as fixtures are replaced.
-
Provides an overview of the ISO 230-2 standard, which specifies methods for testing the positioning accuracy and repeatability of numerically controlled machine tools. ↩
-
Explains the working principle of a Linear Variable Differential Transformer (LVDT), a type of electrical transformer used for measuring linear displacement with high precision and reliability. ↩
-
Describes Experimental Modal Analysis (EMA), a process of determining the modal parameters (natural frequencies, damping ratios, and mode shapes) of a structure based on vibration test data. ↩
-
Offers an explanation of Finite Element Analysis (FEA), a powerful computational method for simulating how a product or component will react to real-world forces, vibration, heat, and other physical effects during the design phase. ↩
-
Details the principles of zero-point clamping systems, a type of modular workholding technology that provides a highly accurate, repeatable, and rapid method for positioning and securing fixtures or workpieces. ↩