


Choose an FRL unit from the machine’s peak flow and the lowest acceptable downstream pressure during that peak. Then check the supplier’s forward-flow curve at your actual inlet pressure and regulator setting. Port thread alone is not a sizing method, and a static gauge reading doesn’t prove the unit can support production flow.
The practical sequence is short: define the air-quality target, calculate overlapping demand, assign a pressure-drop budget, select a curve that stays above the minimum working pressure, and verify it on the running machine. That approach prevents both pressure starvation and needlessly large hardware.
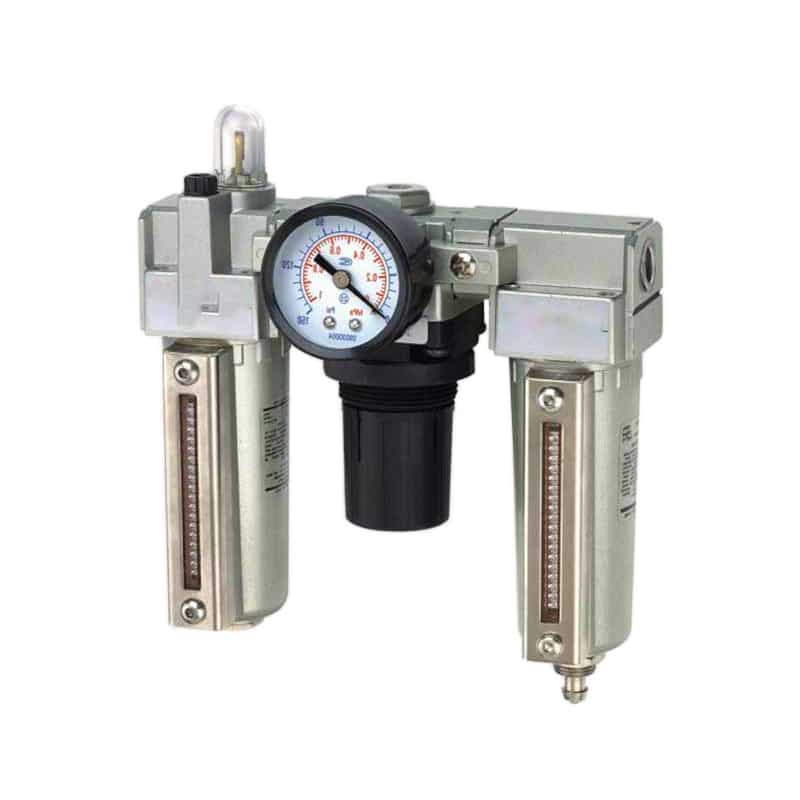
An FRL unit is a point-of-use assembly that filters compressed air, regulates downstream pressure, and adds lubricant only when the application calls for it. Peak event flow is the free-air rate required during the machine’s most demanding simultaneous action. Regulator droop is the fall in regulated outlet pressure as forward flow increases.
Key Takeaways
- Size for the highest simultaneous flow event, not average plant consumption.
- CAGI recommends no more than 10% total system pressure drop to the point of use.
- Validate the selected FRL with inlet and outlet pressure recorded during the real machine cycle.
What Information Do You Need Before Sizing an FRL Unit?
Start FRL sizing with eight inputs: inlet pressure, minimum outlet pressure, peak free-air flow, event duration, port and tube size, required purity class, ambient conditions, and lubrication policy. ISO 6953-1:2024 covers regulators up to 25 bar inlet and filter-regulators up to 16 bar, but each product’s published limits still control (ISO, 2024).
Write the inputs down before opening a catalog. Otherwise, a familiar port size or headline flow number tends to become the decision by default.
| Input | What to record | Why it changes the FRL choice |
|---|---|---|
| Supply pressure | Minimum dynamic pressure at the FRL inlet | The same regulator passes different flow at different inlet conditions |
| Required machine pressure | Lowest acceptable pressure during the demanding event | Establishes the allowable regulator droop and total pressure loss |
| Peak free-air flow | L/min, SCFM, or m3/h for simultaneous events | Sets the required forward-flow capacity |
| Event duration and frequency | Seconds per event and events per minute | Separates short peaks from sustained demand |
| Port and tube size | Thread, tube ID, length, and fittings | Finds restrictions outside the FRL body |
| Air quality | Particle, water, and oil class or process limit | Determines filter stages, drain, and lubrication policy |
| Environment | Temperature, chemicals, washdown, vibration, and sunlight | Determines bowl, seal, housing, and guard options |
| Maintenance access | Bowl clearance, gauge visibility, and drain routing | Determines whether the unit can be serviced safely |
In our experience, a sizing sheet becomes much more useful when it records both static and dynamic pressure. The static value confirms the regulator setting. The dynamic value shows whether the supply path can hold that setting when the machine asks for air.
The outlet-pressure requirement should come from the valve or actuator during motion, not from an idle regulator gauge. If a clamp needs 5.5 bar at its cylinder port, a regulator that falls from 6.0 to 5.1 bar during clamp extension is too small or is being starved upstream.
Air quality needs the same specificity. The FRL reliability guide explains what each treatment stage does. For sizing, translate those functions into measurable requirements such as a purity class, drain type, permitted oil carryover, and pressure loss at peak flow.
How Do You Calculate Peak Flow Without Oversizing?
Calculate peak FRL flow from the machine timing diagram, adding only devices that consume air in the same time window. Parker’s filter-regulator selection method begins with maximum system flow, then allowable pressure drop, then the matching flow curve, a three-step sequence that avoids arbitrary 1.3 or 150% multipliers (Parker, 2026).
First calculate free air for each cylinder stroke, gripper, ejector, blow-off nozzle, or purge. Next place each demand on the actual sequence. A cylinder that moves during loading doesn’t belong in the same peak group as a blow-off valve that opens after unloading.
For cylinders, the demand chain is:
chamber volume = effective piston area x stroke
free air per stroke = chamber volume x absolute-pressure ratio
average flow = free air per event x events per minute
event flow = free air per event / event duration
Use event flow to screen the FRL, valve, manifold, and tubing. Use average flow to review compressor capacity and repeated demand. The pneumatic flow-rate calculation guide covers chamber volume, pressure ratio, and full-cycle air use in more detail.
What if the exact sequence is unavailable? Measure it. A flow meter at the branch and a pressure logger at the FRL outlet can reveal the real peak without inventing a safety factor. Add a margin only for a named uncertainty, such as an approved future actuator, an unmeasured leak allowance, or a supplier’s specified tolerance.
The useful distinction is not average versus maximum catalog flow. It is sustained flow versus event flow. A brief clamp peak may be supported by local storage, while a continuous air knife must pass through the FRL for the entire shift. Those two loads can show the same headline SCFM and still require different solutions.
How Do You Read an FRL Flow Curve?
Use the forward-flow curve that matches the planned inlet pressure and regulator setting, then find the outlet pressure at your peak flow. ISO 6953-2:2024 standardizes tests and presentation methods so regulators and filter-regulators can be compared, but the published curve for the exact model remains the selection evidence (ISO, 2024).
A regulator’s outlet pressure usually declines as forward flow rises. This change is often called droop. On a typical chart, flow is on the horizontal axis and secondary pressure is on the vertical axis. The curve may also specify inlet pressure, spring range, port size, filter grade, or test conditions.
Read it in this order:
- Select the curve for the actual inlet pressure or the nearest conservative condition.
- Find the intended regulated pressure at low flow.
- Move to the calculated peak flow on the horizontal axis.
- Read the resulting secondary pressure from the curve.
- Reject the model if that pressure falls below the machine minimum.
Don’t mix a headline flow rating from one test condition with a pressure target from another. Parker, for example, lists some P32 filter-regulator flows using a 10 bar inlet, 6.3 bar set pressure, and 1 bar pressure drop. That number isn’t proof of performance at a lower inlet pressure or a smaller allowed droop (Parker, 2026).
If a supplier provides Cv instead of a complete curve, Cv can support an early comparison, but it doesn’t describe regulator droop, hysteresis, relief behavior, or filter loading by itself.
Use the Flow Unit Converter when one catalog uses L/min and another uses SCFM. Standardize the reference conditions too. “L/min” without a stated standard or normal condition can produce a false comparison.
How Much Pressure Drop Can the FRL Use?
Assign the FRL only part of the machine’s total pressure-drop budget. CAGI says a well-designed compressed-air system should have no more than 10% loss from compressor discharge to the point of use, and that total includes piping, fittings, dryers, filters, regulators, hoses, valves, and other restrictions (CAGI, 2026).
There is no universal 5 psi maximum for every FRL. The acceptable loss depends on the supply pressure, the actuator’s minimum working pressure, branch losses, valve and tubing losses, and the margin needed for stable operation.
Build the pressure budget backward from the actuator:
minimum FRL outlet pressure
= minimum pressure required at the actuator
+ valve, manifold, muffler, tubing, and fitting losses
+ agreed operating margin
Then compare that minimum outlet pressure with the regulator’s forward-flow curve. If the curve stays above the minimum at peak flow, the candidate passes the catalog screen. If not, choose a higher-capacity model or reduce another restriction.
From our analysis, pressure-drop budgets are better than blanket limits because they show ownership. A clogged filter, small quick coupling, long tube, restricted silencer, and undersized regulator can create the same slow-cylinder symptom. One “FRL drop” number hides which component needs correction.
For straight-run branch piping, the Compressed Air Pressure Drop Calculator can estimate pipe and fitting loss. It doesn’t calculate the internal loss of a filter-regulator, so use the supplier curve for that part.
Which Air Treatment Options Belong in the Selected Size?
Select filtration and lubrication from the required air condition, not from an industry label. ISO 8573-1 classifies compressed-air purity in three primary groups: particles, water, and oil. It doesn’t prescribe one universal micron rating for food, pharmaceutical, automotive, or general manufacturing systems (ISO, 2010).
Start at the point of use. What contamination can the valve, cylinder, instrument, product, or process tolerate? Then check whether the plant dryer and main filters already meet that target. A point-of-use FRL may need to remove local pipe scale and liquid condensate without duplicating every compressor-room treatment stage.
| Decision | Choose from | Verify before ordering |
|---|---|---|
| Particle filtration | General-purpose, fine, or micro-filter stages | Required purity class, pressure drop, element life, and downstream tolerance |
| Water removal | Separator, filter bowl, drain, dryer support | Pressure dew point, condensate load, drain capacity, and freezing risk |
| Oil control | No lubricator, lubricator, coalescing stage | Device manual, process contamination risk, oil type, and carryover limit |
| Bowl construction | Polycarbonate, guarded bowl, or metal bowl | Temperature, solvents, washdown chemicals, impact, and visibility needs |
| Drain | Manual, semi-automatic, or automatic | Shutdown behavior, condensate rate, maintenance interval, and drain routing |
Festo’s current air-preparation overview spans filtration grades from 0.01 to 40 micrometers and filter-regulator flow ranges from 140 to 24,000 L/min. That breadth is evidence against choosing a treatment grade or body size by application name alone (Festo, 2026).
A lubricator is not automatically required because the acronym ends in “L.” Check the downstream component manuals and process rules. Once oil mist is introduced into a branch, removing it later is difficult, and devices that were designed for non-lubricated operation may not benefit from added oil.
Port Size and Installation Details That Change the Result
Port thread is an interface, not a guaranteed flow capacity. Parker’s P32 catalog lists 1/4, 3/8, and 1/2-inch filter-regulator variants at 89, 123, and 136 SCFM under its stated test conditions, showing that capacity does not rise in direct proportion to nominal thread size (Parker, 2015).
Check the smallest passage in the complete air path. A large FRL feeding a small quick coupling, narrow tube, or restrictive shutoff valve won’t deliver the curve shown for a properly connected unit. Conversely, jumping to a larger FRL may not fix a low inlet pressure caused by upstream piping.
Use these installation checks:
- Keep the manufacturer-specified flow direction and bowl orientation.
- Provide the bowl-removal clearance shown on the drawing.
- Put gauges or pressure sensors where inlet and outlet readings can be captured together.
- Route automatic drains so a blocked or frozen line can’t back up condensate.
- Support heavy modular assemblies instead of hanging them from small tubing.
- Confirm the bowl and seals tolerate nearby cleaners, oils, coolants, and ambient temperature.
Place the FRL close enough to the machine to control local air, but leave room for a lockable upstream isolation valve and safe exhaust path. Long downstream tubing adds volume and delays pressure response. Mounting directly against a hot, vibrating, or washdown-exposed surface can create a different reliability problem.
Same-brand modules make mechanical assembly easier, but mixed brands aren’t automatically wrong. Verify thread standard, bore alignment, pressure rating, bracket support, sealing method, flow direction, and maintenance clearance. An adapter that creates a smaller internal passage can erase the advantage of a larger body.
Worked Example: Sizing an FRL for a Clamp Station
This transparent example uses a measured 70 SCFM peak, 100 psig minimum inlet pressure, an 80 psig regulator setting, and a 75 psig minimum acceptable outlet. Parker’s three-step method requires maximum flow, allowable pressure drop, and the matching curve; here the FRL is allowed 5 psig of droop during the clamp event (Parker, 2026).
Assume three clamp cylinders extend together for 0.7 seconds. Their measured combined event demand is 70 SCFM. Other actuators move later in the sequence, so they don’t belong in this peak group.
The selection sheet is:
| Item | Example value | Pass condition |
|---|---|---|
| Minimum FRL inlet pressure during clamp | 100 psig | At least the curve’s stated inlet condition |
| Low-flow regulator setting | 80 psig | Matches the required setup pressure |
| Peak event flow | 70 SCFM | Read at the 70 SCFM point on the curve |
| Minimum acceptable FRL outlet | 75 psig | Curve must remain at or above this value |
| Allowed FRL droop | 5 psig | 80 minus 75 psig |
| Required air treatment | 5 micrometer general filter, automatic drain, no lubricator | Must match the actual device and process requirements |
Candidate A falls to 72 psig at 70 SCFM on its supplier curve, so it fails even if its port thread matches the line. Candidate B stays at 76 psig under the same stated conditions, so it passes the catalog screen with 1 psig of margin.
Those candidate values are illustrative readings, not product claims. The engineer must use the exact curves for the quoted part numbers. If the available curve uses a different inlet pressure, regulator setting, or filter configuration, request comparable data rather than interpolating across unrelated conditions.
Now test Candidate B on the machine. If its inlet holds 100 psig and its outlet stays at 76 psig, the sizing prediction is credible. If the inlet collapses to 88 psig, the problem is upstream. If the inlet remains stable but the outlet falls below 75 psig, inspect the element condition, configuration, and model capacity.
How Do You Commission and Maintain the Selected FRL?
Commission the FRL with a dynamic pressure test, a leak check, drain verification, and documented baseline readings. CAGI recommends replacing filter elements when differential pressure exceeds 5 to 7 psig or at least every six months, while also telling users to follow the individual manufacturer’s instructions for the installed equipment (CAGI, 2026).
Before first startup, verify flow direction, bowl locking, guard installation, gauge range, drain connection, regulator lock, and downstream pressure rating. Bring pressure up in the sequence specified by the manufacturer. A soft-start or dump valve may be needed when rapid pressurization could create unexpected motion.
Record four baseline values at clean-element condition:
- FRL inlet pressure at idle and at peak flow.
- FRL outlet pressure at idle and at peak flow.
- Differential pressure across the filter stage, if measurement ports are available.
- Peak machine flow and the production event that created it.
We found that these numbers turn later troubleshooting into a comparison. If downstream pressure falls six months later, the maintenance team can distinguish a loaded filter from lower plant supply or increased machine demand.
Never open a bowl, remove an element, or loosen a module while stored pneumatic energy remains. OSHA 1910.147 includes pneumatic energy in its energy-source definition and requires stored or residual energy to be relieved, restrained, or otherwise rendered safe before covered servicing work (OSHA, current standard).
The best commissioning question is simple: can the selected FRL keep the machine above its minimum pressure during the exact event that drove the sizing calculation? If the answer is documented with synchronized inlet and outlet readings, the selection is defensible.
FAQs About FRL Unit Sizing
FRL questions usually reduce to four measurable variables: flow, inlet pressure, outlet pressure, and air quality. ISO 6953-2:2024 exists to standardize regulator and filter-regulator comparison tests, while CAGI’s 10% system-pressure-drop guidance keeps the component decision connected to the complete air path (ISO, 2024; CAGI, 2026).
Can an FRL unit be too large?
Yes, although the failure isn’t simply “too much flow.” An oversized regulator may offer poor low-flow control, add cost and installation volume, or use a pressure range that gives coarse adjustment. Check the exact model’s droop, hysteresis, relieving behavior, adjustment range, and minimum useful flow rather than rejecting it by body size alone.
Is a 1/2-inch FRL always higher flow than a 3/8-inch unit?
Not across different product families or test conditions. Internal seat area, filter media, regulator design, inlet pressure, set pressure, and allowed droop all affect capacity. Parker’s P32 example lists 123 SCFM for one 3/8-inch configuration and 136 SCFM for 1/2-inch under its stated conditions, only about an 11% difference.
Should FRL flow equal the compressor’s full output?
Usually no. Size a point-of-use FRL for the peak demand of the equipment it supplies, not the full compressor nameplate. A main-line treatment assembly may serve broader flow, but a machine FRL should follow that machine’s timing diagram, local storage arrangement, minimum inlet pressure, and required dynamic outlet pressure.
Does every pneumatic system need a lubricator?
No. ISO 8573-1 treats oil as one of three principal compressed-air contaminant categories, and many modern components are intended for non-lubricated service. Add a lubricator only when the downstream manufacturer requires or permits it and the process accepts oil carryover. Once lubrication starts, follow the specified oil and rate consistently.
How can I tell whether the current FRL is undersized or clogged?
Measure inlet and outlet pressure during the same peak event, then compare with the clean-element baseline. Stable inlet pressure with excessive outlet droop points toward the FRL or its element. Falling inlet and outlet pressures suggest an upstream restriction or supply issue. CAGI uses 5 to 7 psig differential pressure as general filter-service guidance.